PowerGrab Adhesive Usage Instructions
Preparation:The temperature of the adhesive, the surfaces and the working area must be above 50°F (10°C)
One surface must be porous.
Surfaces must be clean, dry and free of frost, grease, dust and other contaminants.
To obtain maximum adhesion, surfaces should be flat to provide adequate contact.
-
Painted surfaces must be well cured and free of loose paint.
-
Sand glossy surfaces to a dull finish.
-
Pre-fit all materials before applying adhesive.
-
Remove nozzle.
-
Cut the tip off the cartridge just above the threads.
-
Replace nozzle and cut at a 45° angle to desired bead size.
-
Pull red cap off of nozzle.
-
Remove the white tab.
-
Turn nozzle 90° in a counter-clockwise direction.
-
Press the red lever to dispense product.
-
The bead size and speed of extrusion can be adjusted by using the button on the trigger.
-
To close, turn the nozzle 90° in a clockwise direction and replace red cap on nozzle.
-
Apply a continuous bead to one of the surfaces.
-
Press material firmly into place within 20 minutes. Repositioning time is approximately 15 minutes, depending on bead size.
-
For larger areas, such as panels and drywall, apply adhesive around the perimeter 2″ (5 cm) in from the edge and vertically every 12″ (30 cm).
-
Alternatively apply a continuous bead to all furring strips, studs and top and bottom plates.
-
When applying materials to a vertical surfaces, the maximum vertical load the adhesive is safely rated for on a porous substrate is 10 grams/cm² or 20 lbs/ft² of bond area.
-
No bracing is usually required. However, use clamps and other means of support for materials that exceed the maximum vertical load to insure maximum contact for 24 hours or until dry.
-
For exterior use, protect the cured adhesive from the sun, rain and snow by painting it or with structural coverings that allow good air circulation.
-
Clean tools and adhesive residue immediately with soapy water.
-
Cured adhesive may be carefully cut away with a sharp-edged tool.
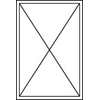
Perimeter bead size ¼″ to 3⁄8″, 3″ from edge plus or minus as needed.

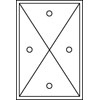
Perimeter bead ‘W’/‘X’ pattern and spots of spray adhesive on panel and substrate, or as needed.
1 can of spray adhesive and 4 tubes of adhesive is recommended for 20 – 2′×4′ panels.
